summary

Cooking without a safety net

Thursday, December 26, 2013

Pumpkin Bread Another Way

As I mentioned, despite my best intentions, I keep screwing up the amounts of thawed pumpkin I have on hand.  When I went to make the pumpkin pie for the Chief Taster's family's Thanksgiving, I read the recipe card (in my own handwriting, thus removing my last excuse) and found that I didn't need 2 C of puree, but 1.5.  This explained why my previous pie barely fit in the crust--I had used 2 C for that one.

I did it right for Thanksgiving, but then I had a tiny portion of leftover pumpkin, and I wasn't really sure what to do with it.  A couple weeks ago, I remembered it was still in the fridge, and I figured I should use it or toss it, and I hate to throw food away, so I decided to make pumpkin bread again.  I was all wound up for it when I remembered that I needed 1 C for a half-batch, and I only had 1/2 C.  Then I measured it (good call), and found that I really only had about 1/4 C.

But I still wanted to bake something, because it had been raining all day, and I was done working on Plan B for a while, and I had Spanish Chicken simmering away in the Crock Pot for five more hours, and it felt like fall, dammit, so I wanted to bake something.  Still, I only had 1/4 C of pumpkin puree.

Of course, there's also some leftover sour cream in the fridge that will pass its Use By date in a few more days.  Pumpkin puree is sort of creamy.  Sour Cream Pumpkin Bread doesn't sound like a bad idea, per se.

Kids: this will NOT taste like a creamsicle.
So I did it.  What follows is a sort-of recipe, or at least a record of what I did.

3/4 C pumpkin puree/sour cream slurry (I had about 1/4 C puree and 1/2 C sour cream.  I might have gone with 3/4 C sour cream, but that was all I had.)
1/2 plus 1/3 C sugar
1/3 C vegetable oil
1 t vanilla
2 large eggs
1.5 C flour (you can use whole wheat if you want.  Go ahead.  Pretend this is healthy.)
1 t baking soda
1/2 t salt
3/4 t ground cinnamon
1/4 t ground cloves
1/4 t baking powder
1/2 C chocolate chips
  1. Move oven rack so the tops of the loaves will be in the middle of the oven, and preheat it to 350F.  Grease just the bottom of an 8x4 inch pan.
  2. Combine pumpkin slurry, sugar, oil, vanilla, and eggs.  Mix well.  Really well.  Don't leave any lumps of sour cream.  Add everything except the chips. Mix well.  Add chips.  Mix again.
  3. Pour batter into loaf pan.
  4. Bake 50 to 60 minutes (I was closer to 65 before the toothpick test passed).  Check with a toothpick (inserted in the center, it should come out clean.  If it doesn't, give it a few more minutes).  Cool 10 minutes before removing from pan to wire rack.

Thursday, December 19, 2013

Pumpkin bread the (almost) right way

Around the same time we went apple picking, I bought a couple small pie pumpkins at the grocery.  We had just had our first day of fall weather (it dipped below 60F for almost an hour one afternoon), and I was all fired up for warm baked goods, stews, soups, and cocoa.  Plus, we were going to go share a cabin and some hiking with friends who had requested pumpkin pie.  I had big plans for apple butter (check), pumpkin pies (multiple requests to fill), pumpkin cinnamon rolls (pending), and I had theorized a formula for apple walnut cinnamon rolls (still just a theory--I ran out of apples).  Then, because it's Virginia, temperatures climbed back into the 70s and 80s for several weeks.  I've lived here for almost two years, and I'm convinced that there are two seasons: Way Too Warm, and Slightly Less Warm Than The Other Season.

But I digress.

After roasting and pureeing the pumpkin, I sealed it in handy 2 Cup portions and tucked them away in the freezer.  I got three or four portions of that size, and an additional 2/3 C, which is coincidentally the exact amount that I need for SK's pumpkin cinnamon rolls (I've made them before, and sometimes find myself in mid-July wishing fall would hurry up and fall so I can make them again).  I took this as a sign of kismet smiling upon me: I was meant to have those cinnamon rolls.

Naturally, after making a batch of pumpkin chocolate chip cookies (1C pumpkin required), I screwed up and grabbed the 2/3 C portion when I wanted the 1 C leftover portion and... anyway, despite my luck in picking pumpkin puree portions, I've been doing ok--except that I was excited about all the 2 C portions, perfect for pies, before I realized I only need 1.5 C for a pie.  I didn't look too closely at the recipe when I made that first pie, and was puzzled when I barely got the filling to fit in the crust.  In fact, I didn't figure that out until just before I sat down to write this post, four pumpkin recipes later.

One of those recipes was pumpkin bread.  I knew I had that 1 C of leftover puree in the fridge (when I realized I had the 2/3 C portion thawed, I just made pumpkin pretzels, only to realize I couldn't taste the pumpkin at all.  Whoops), and I had already checked the recipe, so I knew that would work.  Except I forgot that I had determined it would be enough for a half recipe, and didn't halve anything else as I happily dumped ingredients in a great big bowl, so I had to thaw a 2 C portion and make a bigger batch of bread.

For someone who used to be good at math, I've been terrible at tracking pumpkin fractions this fall.

Pumpkin Bread (adapted from Betty Crocker)

2 C pumpkin puree (or one 15 oz can--don't use the pie mix.  Just pumpkin puree)
1 2/3 C sugar
2/3 C vegetable oil
2 t vanilla
4 large eggs
3 C flour (you can use whole wheat if you want.  Go ahead.  Pretend this is healthy.)
2 t baking soda
1 t salt
1 t ground cinnamon
1/2 t ground cloves
1/2 t baking powder
1/2 C chocolate chips
1/2 C chopped pecans (the original recipe called for 1/2 C each of raisins and coarsely chopped nuts, but I wanted chocolate.  I threw in the pecans more because I had them handy than because Betty told me to.)
  1. Move oven rack so the tops of the loaves will be in the middle of the oven, and preheat it to 350F.  Grease just the bottom of a 9x5 inch pan (or two 8x4s).
  2. Combine pumpkin, sugar, oil, vanilla, and eggs.  Mix well.  Add everything except the chips and nuts. Mix well.  Add chips and nuts.  Mix again.
  3. Pour batter into loaf pan(s).
  4. Bake a 9x5 for 70 to 90 minutes.  Bake 8x4s 50 to 60 minutes.  Check with a toothpick (inserted in the center, it should come out clean.  If it doesn't, give it a few more minutes).  Cool 10 minutes before removing from pan to wire rack.
The recipe says you should let it cool completely (around 2 hours) before slicing, but seriously?  You're going to look at this thing of beauty and think, "nah, I don't need to stuff that in my face right now, while it's still warm and the chocolate's gooey, and it smells so good and--" (furious chewing noises).


Thursday, December 12, 2013

Rhinoceros

When I lived in Bend, a friend brought his family to visit for a few days.  We hiked to waterfalls, explored lava caves, and floated through town on rented inner tubes.  It was great.

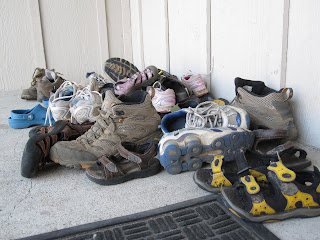
We made quite a shoe mountain on the porch after every hike.
I did my best to feed them during the visit knowing that there were three children, and an adult who doesn't "eat anything that swims."  I managed ok.  One of our dinners became a running joke; I had filled the Crock Pot before we left that morning, and when we returned, one of the kids asked what we were having for dinner.  Their dad told them "rhinoceros."  They didn't believe him, but then I extracted a large piece of bone, which happened to be shaped very convincingly like a rhinoceros horn.  "Sure it is," I told them, holding up the bone.  "See?"  I don't know whether the kids believed us, but when the mom posted on Facebook that we were eating rhinoceros sandwiches for dinner, she was immediately met with responses of "where ARE you??"

NOTE:  it wasn't really rhinoceros.  I like rhinos, and I'm very sad that the black rhino was recently declared extinct.  That's horrible.  But calling pulled pork sandwiches "rhinoceros" is too much fun to pass up, so the name stays.

The recipe is from Betty Crocker.

Pulled Jerk Pork Sandwiches
2.5 lb boneless pork shoulder (get it with a bone if you want to convince children it's rhinoceros)
1 T dry Jamiacan jerk seasoning
1/4 t dried thyme
1/2 C chopped onion
1 C cola
2 C barbecue sauce
sandwich buns

(If pork is tied or in netting, leave it in place for now)  rub jerk seasoning over pork, sprinkle with thyme.  Place in slow cooker and sprinkle onion over it.  Pour in cola.  Betty will tell you to to pour it over the pork, but that will wash away a lot of the seasoning you just applied, so I usually pour it down the side of the crock.  It'll be in there for hours; there's no chance of it getting too dry because you didn't dump a cup of liquid on top of the meat.

No rhinos were harmed during the making of this delicious meal.
Cover and cook on Low 8-10 hours.

Remove pork from cooker and put on a large platter or (my preference) in a big bowl.  Shred with two forks, and remove any netting or string.  Remove juice from cooker, reserving 1/2 C.  (You can set the rest aside and re-heat it for au jus style dipping, if that's your thing, but it's not mine)  Return pork and 1/2 C juice to cooker.  Stir in barbecue sauce.  Cook on High 30-45 minutes.  Serve on buns.  Watch Animal Planet.

Thursday, December 5, 2013

Butter me up

The Chief Taster and I decided to go apple picking one day this fall, mainly because she had the day off and we wanted to go do something.  Something that enables food usually seems like a good idea, and I had a lot of ideas for how to use apples.  Namely, I wanted to make apple butter.

The only time I clearly remember making apple butter was on a Scout outing.  It was a big council-wide event, and each troop had some sort of activity set up for people as we all cycled through the various areas.  My troop had built a rope bridge between two trees, but we also had a big iron pot sitting on the fire all day with apple butter slowly simmering.  That's the traditional way to make apple butter: outside, in a large batch, with a big group of people.  That's because you have to cook the stuff, stirring constantly, for about two hours, and it helps to have someone else take a turn with the spoon.  Sadly, they won't let me start fires in the courtyard outside our building, so I hung out by the stove for a while with a crossword and my nook.


Apple Butter
4 pounds apples
1 C cider vinegar
2 C water
about 4 C sugar
salt
2 t cinnamon
1/2 t cloves
1/2 t allspice
grated rind and juice of 1 lemon

  1. Quarter the apples and put them in a large pot with the cider and vinegar.  Cover, bring to a boil, and reduce to a simmer for about 20 minutes.
  2. Run through a mill (I have one of these, but Mom used one similar to this.  Either works.) and measure result.  Add 1/2 C sugar for every C of apple pulp.  Add seasonings, lemon rind, and lemon juice.
  3. Cook uncovered over medium-low heat 1-2 hours, stirring constantly.  You want it thick.  The longer you cook, the thicker it will get.
A couple notes: the nice thing about either of those food mills is that they mash and strain what you want, and leave what you don't want.  Seeds, stems, peel, and core chunks can be separated, and you only get tasty apple pulp in your food, so you don't need to core and peel the apples first.  In fact, you shouldn't.  Natural fruit pectin is in the cores, and that will help the apple butter gel.  I had a little trouble while cooking the apple chunks, because only the ones which were down in the vinegar and water got soft.  Solution: scoop apples out of the bottom and run those chunks through the mill while others cook.  If it feels soft, it's ready to mill.

You'll want to have your jars and lids prepared by the time you finish.  Use your favorite method; I boiled the lids and put the jars in the dishwasher.  I don't have a funnel, so I had to be very careful while ladling the apple butter into jars.  Leave a little headspace at the top, make sure there's no apple goop in the threads, and screw the lids on tight.  Then set the jars aside, and leave them alone.  You might hear the lids pop down as the jars cool.  They'll be safe for quite a while until you open the lids--then you should put them in the fridge.